On this instruction i will show to you how you can edit Sony Xperia 1 II 5G NR/LTE-A Bands / Carrier Aggregation Combinations with Qualcomm Software. Sony has limited band and carrier aggregation support per network.
You can check in cacombos.com Xperia 1 II supported Carrier Aggregation combinations.
This instruction is for Xperia 1 II. If you have Xperia 1, follow instruction here or XZ2 follow instruction here. Before you follow instruction, make sure you have already rooted Sony smartphone. Be careful, because this can make your device unusable.
Requirements
- USB-cable between your desktop and phone
- On desktop, you must have platform-tools downloaded and drivers for your Sony phone
- QPST-application. Please find application from internet
Please enable under Developer Tools USB-Debugging on your Android phone. Then connect your phone with USB-cable to desktop. Make sure your USB-default action is “No data transfer”.
Open command line and run adb shell -command:
.\adb.exe shell
enable Qualcomm diag:
XG-AT51:/ $ su
XG-AT51:/ # setprop persistent.sub.eng 1
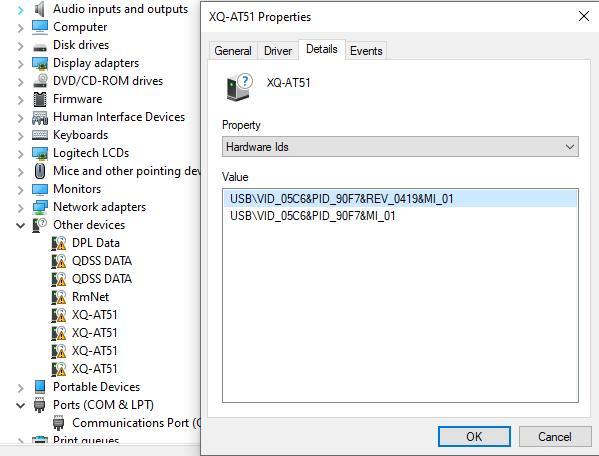
Your phone will now automatically disconnect and reconnect again. If you phone prompt “Allow Access?” dialog, please Deny because this change setprop value back to default. On Device Manager, you should see now list of Unknown devices. Search XG-AT51 -driver where Hardware Ids is something like MI_01.

Download and Install Qualcomm Modem Driver to this device using Update Driver function. Select Browse my computer for driver software -> Let me pickup from a list of available drivers on my computer -> Show all Devices -> Then Have disk and find driver file on your computer.

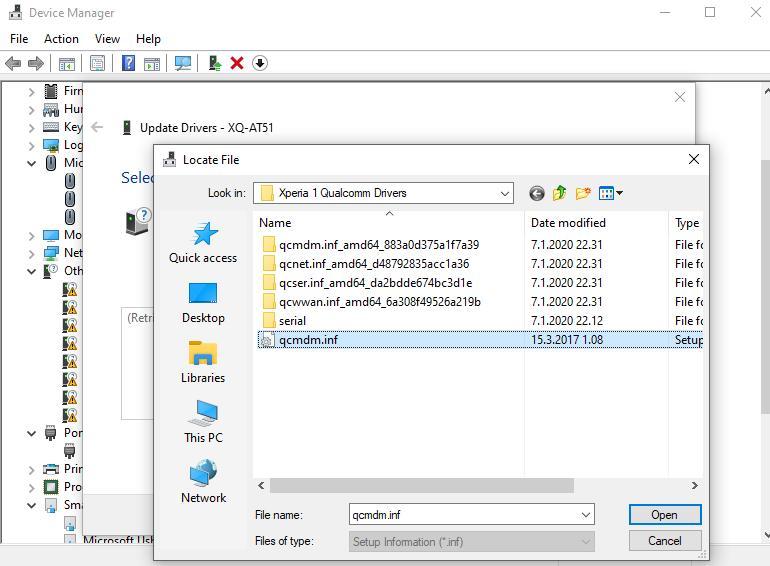
Select qcdm.inf file on extracted folder. Then install Qualcomm Android Modem 2020. Your computer will warn about compability but continue still installation.
When you have installed, open QPST-application and go to ports tab and click Add new Port…

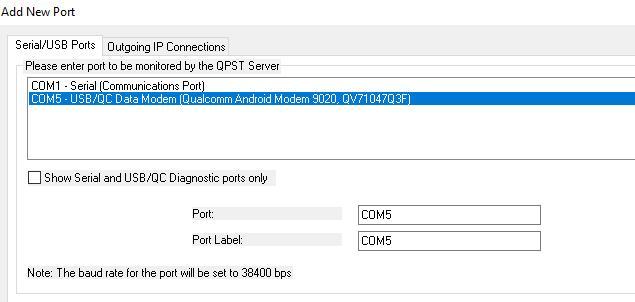
Uncheck Show Serial and USB/QC Diagnostic ports only and select now device.

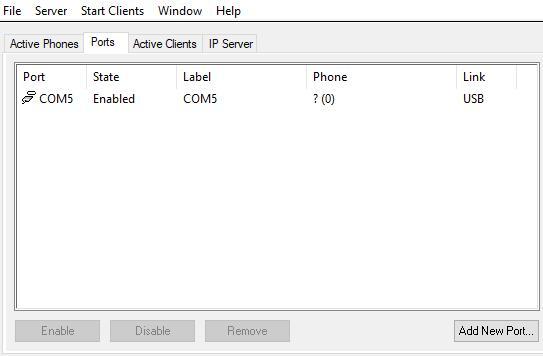
Now you should se phone in Active Phones and Ports tab. If you do not see phone on list, please make sure you do not have Network Signal Guru App same time open on your phone. It use same interface as QPST so cannot run same time.
You can now make backup with Start Clients -> Software Downloads -> Backup before do any changes.
Now you have backup so we can open EFS Explorer (Start Clients -> EFS Explorer). Select your device and wait a moment.
Then go to policyman folder. On latest Xperia phone, there is many XML files so i recommend copy all to your computer and backup these. If there is _Subscription_01.xml file, it’s for second SIM-card.

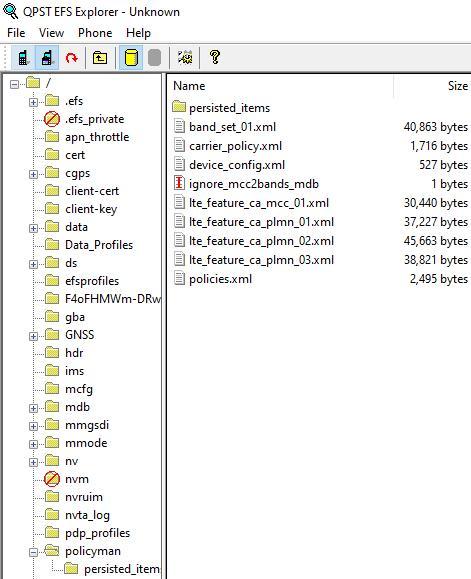
You can now modify band limitations in band_set_01.xml file and carrier aggregation combinations in lte_features_x.xml files. After modify file, please make sure XML syntax is correct and upload file back to phone. Reboot your phone and then your phone load latest configuration.
Disable Xperia System Service
I recommended disable Xperia System Service on Xperia 1 phone so then it doesn’t load default configs when you swap SIM-cards with Disable Applications [Root] -app.


Hi Minh, i did the procedure for the Xperia 1 (J9110) with success thanks, quick question how did you root the new Xperia 1 II? XDA? i couldnt find a clear procedure.. Thanks for your response
Unlock bootloader, patch boot.img with Magisk and flash patched boot.img.
You can get boot.img with XperiFirm.
Hi
Can this work on Redmi Note 9S? The same method by editing carrier policy
No it doesn’t work because Redmi 9S doesn’t have Carrier Policy what limit combinations per PLMN. All combinations are already enabled what is defined to hardware: https://cacombos.com/device/M2003J6A1G
Oh, I see.
What about hypothetically getting the QCN file of Note 9 Pro and flashing it to Note 9S. Considering they both have the same X15 LTE modem?
I really need 4G+ and it is sad that the pro has CA enabled for all my ISPs while the 9S does not.
Hello, can this be used to get 5G support for the Xperia 1 ii in the USA, on T-Moble?
If device support band used by T-Mobile US then you can enable/disable with Carrier Policy the 5G support.
Dear Minh,
Thanks for your tutorials. I need your support against the G781B.
CA is locked in my country and i cannot get the 5-3 CA band combos also how to enable the 5G in it.
Hi Minh ,i do not see phone on list of QPST, can you please support
Check you have installed Qualcomm drivers to your computer.
yes,already installed,i can see qualcomm modem2020
Can someone extract these files and give them to me?
setprop persist.usb.eng 1
setprop sys.usb.config eng_mode,adb
Hi Minh,
I want to try this procedure with a Xperia 5 Mark II, but when I put this command: XG-AT51:/ # setprop persistent.sub.eng 1 on nothing appears and I dont’see XS-A52 in Other Devices page, any suggest?
At least on my Sony XPERIA 1 II, this command is needed setprop sys.usb.config eng_mode,adb
(thanks to REDRUM REDRUM above).
The only problem I have is that restarting the phone seems to erase the diag setting and it need re-applying.
How can I enable Wifi calling on Xperia 1 II?
Is there a similar method? I flashed SEA firmware and that gave me Volte feature but I really need wifi calling to work
hello,
Can telecom operator enable these features without root. maybe via android Aosp app
Thanks
Regards,
Dear minh! Thank you so much for your article. We go throu the algorithm algorithm but faced with followinn issue after su command:
sh: No controlling tty: open /dev/tty: No such device or address
sh: warning: won’t have full job control
Is there any way to manage this stuff
hi,
I tried this with teh Xperia 10 iii,
the first step launching the Shell command doesnt work
I dont know if I may be doing something wrong
does the phone need to be in Fast boot or flash mode
or just standard on
when it i standard on it doesnt detect the phone, and in the device mager it reads as SOny adb interface with error
(Failed to set property ‘sys.usb.config’ to ‘1’)
This is XQ-BC72 (rooted with Magisk) model. Is there any way to fix this error?
Hi Minh,
Can I follow your guide and then use the modem files from this website:
https://band.radio/xperia-band-unlock
Is there any reasons why I should not use their files?
Should I modify my files myself?
Thank you
How to edit band list ? That’s what I don’t know 😞 8m so new in this please tell me how to edit it for UAE ?
Hi Expert, Is there any similar service as Disable Xperia System Service for samsung. The carrier policy keep resetting to the default setting whenever i change a sim card.